Garrattfan's Modelrailroading Pages
OO9 NGG16
Chapter 7 Front tank

The start
|
So far I have used 180 C solder. From here I used 145 C solder in order not disturb the joins I have made here. |
The front tank follows the same principle as the rear tank: inner frame structure for strength with a thin outer skin for detail. Soldering was easy. Note however that there are a few recesses that are not intended as a bending seam (you can see one on the furthermost side in the middle. The manual does not explicitly mention NOT to fold the brass sheet there. These recesses are intended to take up another brass sheet. The door panel (right) is easily bent over a suitably sized drill bit in a vise. |
|

The whole superstructure is squared before finalizing the joins. |
|

Next phase was to prepare the skin of the tank. As with the rear tank this skin is a little curled. By rolling it over it flattened. The skin is annealed, this is: heated to a considerable temperature so that is will loose much of its strength and hence will not be so springy anymore. I annealed it by simply heating it is a gas flame. |
|
 |
 |
Origami once more. After annealing the skin is positioned most accurately on the inner frame and tack soldered on two corners (as mentioned with 145 C solder from here on) |
|
 |
 |
| The inner frame is then rolled over the skin | and secured on the loose side by two clamps (err laundry pins). See to it that the skins is correctly positioned all the way. I was happy with the result (first attempt, mind you) and soldered all the seams. |
 |
 |
| There was only one minor irregularity, which was eliminated with ample solder and some filing | The end result from the front |
 |
and the rear. The coloration of the skin is caused by the annealing. |
For the rest the tank was basically the same as the rear tank. Photos below show the completed tank. |
|
 |
 |
 |
|
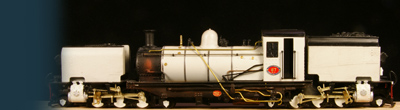
One final shot of the front tank mated to the front truck. Note some subtle differences with the previous photo.
|
|


Sign my
GuestBook